 Stack Overflow
 LinkedIn
 GitHub
Almost 10 years later, we are going to start using GIT. Follow our story and see a small manual so you can use what you already know about TFVC to learn how to use GIT in Visual Studio. In this article I only talk about file versioning; the collaborative tools, checkin policy, issue tracker, etc. will have their turn as soon as we get used to GitHub.
Our little story
I remember as if it were yesterday the excitement of setting up the TFVC client; back then we were migrating from the infamous Microsoft SourceSafe to what was, at that time, the promise of better days at work.
Team Foundation Version Control was beautiful; it came with the promise of being the ideal tool for versioning files in bigger projects, robust and fully configurable, and its wonderful diff and merging, which really worked, were a success (and still are) inside our team.
We said goodbye to the \\DONEBY: annotations and to the hours lost with practically manual merges. The winds of change were whistling in our office.
Almost 10 years later, once again driven by necessity, we are migrating, this time from our beloved companion TFVC to GIT. But why? It sounds silly, but the main reason is that it is not fast enough.
Although there is no limit to the number of items you can have in the same workspace, when this number grows, Visual Studio’s performance drops drastically; that is indisputable. Of course, there are ways to reduce this effect, but the fact is that there comes a moment when nothing helps anymore, and so we are forced to look for new options.
Now GIT, besides being an excellent version control system, robust and maintained by a huge community, has as its main promise being extremely fast.
And it has been! Our initial tests showed that using it with Visual Studio will make our work countless minutes faster. A clear example is when we decide to switch from one branch to another; a process that in TFS took on average up to a full minute happens almost instantly with GIT1.
It proves to be a natural choice for those who got used to a product that is easy to use and just works.
First steps with GIT for a TFVC Developer
Git is much simpler than TFVC, and the first thing you will notice when you start using it will be its terminology, some slightly different concepts, and missing and/or extra features, which end up making everything look confusing; but don’t worry, below I list the main differences between the two.
Goodbye workspaces
A mandatory and very important feature in TFVC does not exist in GIT. To start working with GIT you don’t need to create workspaces, configuring directories, file locations, permissions, etc. Just choose a directory on your computer, clone the repository you want to work on, and get to work.
Branches are simpler
It really shines here; unlike TFVC, which forces you to copy all the files of the current project into a different directory for a new branch, GIT is smart enough to manage by itself the differences between the files of each branch using the same directory.
No more Check ins or Check outs
Git has no concept of file lock; you can edit and ‘submit’ any file at any time to the central repository on any branch2, but be careful: checkout in GIT has another meaning.
This has an interesting effect: to avoid future headaches, from the very beginning teams find themselves obliged to agree among themselves and work following a certain pattern to make sure there are no conflict problems.
Among them, the most known and used is git-flow, which basically uses branches to organize the updates to the code base.
Local and server repositories
Just like TFVC has local and server repositories, so does GIT, but they are conceptually different.
In TFVC, when you use the local repository option, on every operation (checkin, checkout, shelve, etc.) TFVC checks the content of each file in the workspace against the files in the server repository; for server repositories, the check is only on the read-only flag.
In GIT it is different: you will always work on your local repository, sending to the server only when the work is ready.
Commits, fetch, pull, push and sync
In TFVC there are basically two ways to work with files:
check out, which basically tells TFVC that you want to edit the file, andcheck in, where you send the changes you made to the central repository, visible to everyone.shelveandunshelve, similar to the previous one, but the changes are available only to you.
In GIT the workflow is different; first you need to understand that your files will always be in one of four different states:
untracked: as the name says, these are files that git is not tracking. Files that were not present in the last commit and have not beenstagedyet;unmodified: files that were in the last commit and were not modified;modified: files that were in the last commit and were modified but have not been staged yet;staged: files that are ready to be part of the next commit;
File state flow
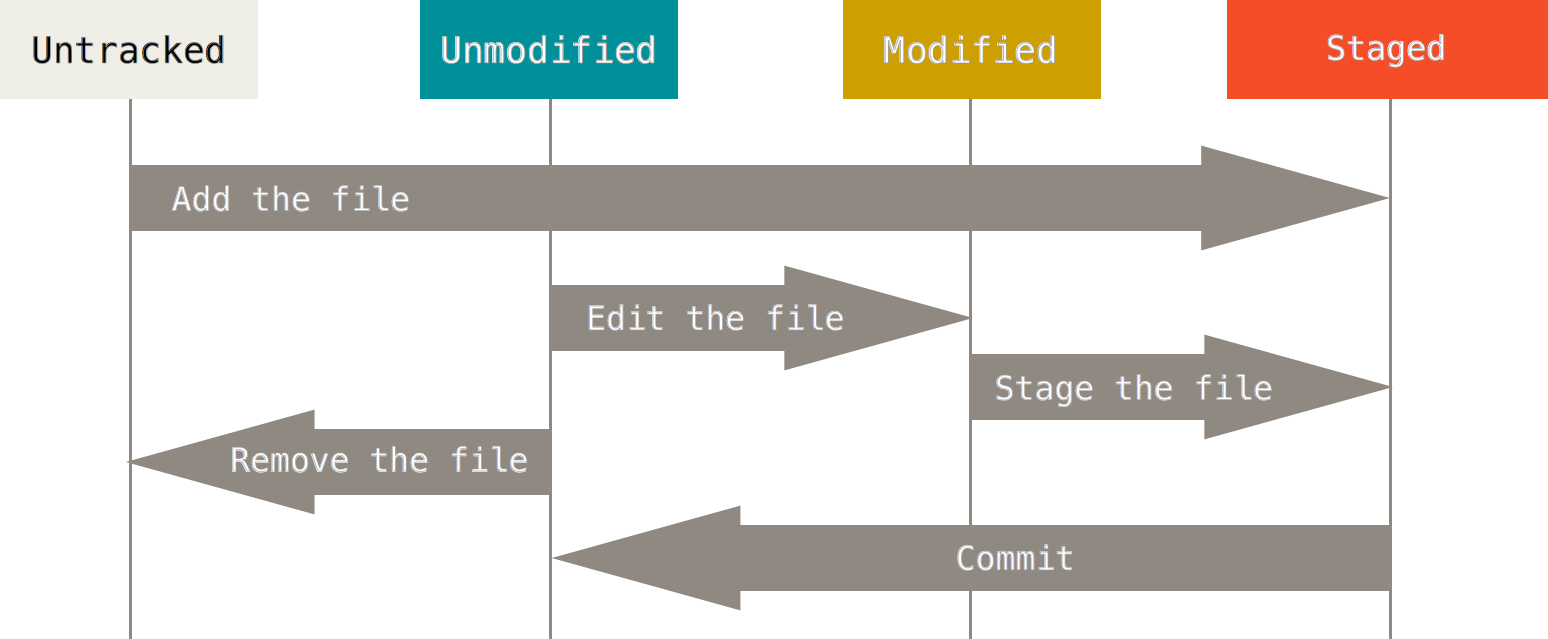 Where from and where to a file can ‘jump’ during its lifecycle, source: https://git-scm.com/
commit
A good analogy would be to compare them with the Windows restore feature, where ‘restore points’ are saved before important changes are made to the system, allowing you, in case things go wrong, to go back to a safe version.
Commits in GIT are an important tool; besides letting developers save their progress by marking safe points they can go back to if something goes wrong, when well done they can also be an excellent way to automate documentation.
Don’t forget that only staged files are recorded by the commit.
fetch
Downloads the named HEADs or tags from the server repository, along with their objects, updating your local repository WITHOUT doing a merge.
A super simplification would be to think that the files on your computer have reference links to a commit version on the server. When this version changes, you need to update this reference before you can send new versions. What fetch does is download the updates that happened since the last fetch and save them in a ‘special area’ that you can inspect, if you want, before doing a merge.
pull
Pull, besides fetching the files like fetch does, also does the merge automatically for you. See this example.
Imagine this is the state of your repositories:
	  A---B---C master on the server
	 /
    D---E---F---G master <- local repository
	^
	origin/master last fetch (or pull)
After the PULL, git will update the references of commit G with B and C, which were made on the server, creating a new one from the merge called H.
	  A---B---C master on the server
	 /         \
    D---E---F---G---H <- local repository
push
When you have finished your work, fixed that bug or feature, use this command to send your changes to the server repository. This command will take all the changes that were committed locally and send them to the server. But be careful: you can only ‘send’ if the local/remote references are up to date, so it is always a good idea to check using fetch.
sync
Think of sync as everything said above, but done from a single user operation. It will do whatever is needed so that your local repository becomes equal to the remote one: fetching updates (fetch), merging (merge) and sending your changes (push), leaving some work for you to do only if there is a conflict.
Conclusion
Without a doubt GIT is an excellent tool that made our development cycle much more productive. Every day that goes by we learn more, and the easier its daily use gets. It really was an excellent decision that will last for a few more years.
Comments
Comments are hosted by Disqus, which sets cookies and shares data with Disqus. Load comments? Read the privacy page for details.